Transform Your Car with Baby Oil: 4 Amazing Car Care Hacks
Your car is an investment, but keeping it looking showroom-fresh can be expensive. Between professional detailing, specialized cleaning products, and restoration kits, the costs add up quickly. But what if the secret to a gleaming exterior was already sitting in your bathroom cabinet?
Baby oil—that simple, inexpensive bottle of mineral oil and fragrance—is a surprisingly powerful tool for car care. From restoring cloudy headlights to giving your tires a deep, rich shine, this household staple can handle a surprising number of detailing tasks for just pennies. Here are four amazing car care hacks using baby oil, along with everything you need to know to get professional results safely.
Why Baby Oil Works on Cars
Baby oil is primarily mineral oil, a clear, odorless, lightweight oil derived from petroleum. Unlike many commercial car care products, it contains no harsh chemicals, solvents, or abrasive compounds. This makes it gentle on paint, plastics, and rubber while still delivering impressive results.
The secret lies in how the oil interacts with surfaces. When applied to plastic or rubber, it penetrates the material and replenishes the oils that have been lost to sun exposure, UV rays, and repeated washing. This restores the material’s natural color and shine. On painted surfaces, a thin layer of oil can fill minor imperfections and create a temporary glossy finish that repels dust and water. Because it is a pure oil, it is also excellent at dissolving sticky residues without damaging the surface underneath.
It’s important to note that baby oil is a temporary fix, not a permanent restoration. The results typically last from a few days to a few weeks, depending on weather conditions and how often you wash your car. But for a quick, low-cost improvement, it’s hard to beat.
Hack 1: Restore Cloudy Headlights
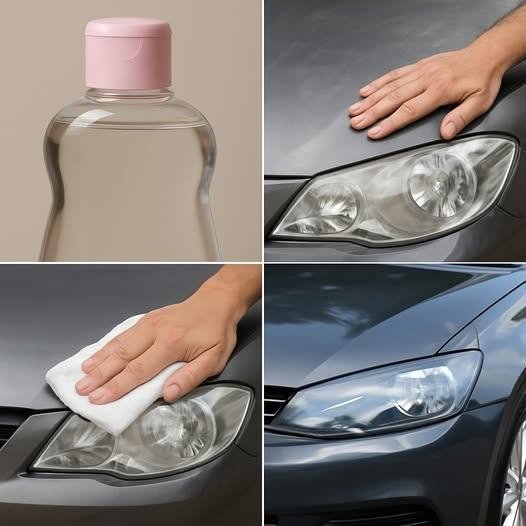
Cloudy, yellowed headlights are not just an aesthetic problem—they can reduce your visibility on the road and cause your car to fail safety inspections. Professional headlight restoration kits can cost anywhere from $20 to $50 or more. Baby oil offers a fast, temporary alternative.
How to Do It
Wash the headlights first. Use soap and water to remove dirt, bugs, and grime from the lens surface. Dry thoroughly with a clean microfiber cloth.
Apply baby oil to a cloth. Put a small amount of baby oil onto a clean microfiber cloth or paper towel. Do not apply it directly to the headlight, as this can cause an uneven application.
Wipe the headlight. Rub the oil into the lens in a circular motion. You should see the yellowing and cloudiness begin to fade almost immediately.
Buff off the excess. Use a dry, clean cloth to wipe away any remaining oil. The result is a clearer, brighter headlight that looks significantly newer.
This hack works best on headlights that are mildly to moderately cloudy. If your headlights are severely yellowed and oxidized, the baby oil will provide only a temporary improvement. For deep restoration, you’ll need to wet sand and polish the lens. The baby oil trick is a great quick fix before a car show, a date, or a road trip, but it will need to be reapplied periodically.
Hack 2: Revive Faded Plastic Trim
Black plastic trim on bumpers, door handles, and mirrors has a tendency to fade to a dull, chalky gray over time. This is caused by UV rays breaking down the oils in the plastic. Baby oil can restore that deep black color in just a few minutes.
How to Do It
Clean the trim. Wash the plastic surface with soap and warm water, then dry it completely. The oil will absorb better into a clean surface.
Apply a small amount of oil. Pour a coin-sized amount of baby oil onto a clean cloth. A little goes a long way.
Massage it into the plastic. Rub the oil into the faded trim in circular motions. You should see the color deepen almost immediately. For severely faded trim, you may need to apply a second coat.
Buff with a dry cloth. After a few minutes, use a clean, dry cloth to wipe away the excess oil. This prevents a greasy residue and gives the plastic an even, satin finish.
For an even longer-lasting result, some enthusiasts recommend mixing baby oil with mineral oil in a 50-50 ratio and leaving it on thicker for a couple of hours before wiping away the excess. Just be aware that the effect is temporary and will wash away after a few rains or car washes.
Hack 3: Remove Sticker and Adhesive Residue
Whether it’s an old bumper sticker, a dealer decal, or the sticky residue left behind by a registration tag, adhesive residue is a frustrating problem. Commercial adhesive removers like Goo Gone work well, but they contain harsh solvents and can be expensive. Baby oil is a gentle, effective alternative.
How to Do It
Apply baby oil to the residue. Pour a small amount of baby oil directly onto a terrycloth towel or microfiber cloth. You can also apply it directly to the sticky area.
Let it sit for a few minutes. The oil needs time to penetrate and break down the adhesive. For stubborn residue, let it sit for five to ten minutes.
Rub the residue away. Using the cloth, rub the area in circular motions. The adhesive should begin to soften and lift away. For particularly stubborn spots, you can use your fingernail or a plastic scraper (never metal) to gently pry it up.
Wash the area. Once the residue is removed, wash the area with soap and water to remove any oily film.
This method is safe for painted surfaces, glass, and most hard plastics. It’s also gentle enough to use on interior surfaces like dashboards, though you should always test it on an inconspicuous area first. One forum user reported that a terrycloth towel and Johnson’s Baby Oil outperformed even commercial products for removing glue residue.
Hack 4: Give Tires a Deep, Rich Shine
That deep, dark, glossy look on new tires is the hallmark of a well-detailed car. Commercial tire shines can be expensive and often contain silicone or petroleum distillates that can dry out rubber over time. Baby oil is a gentle, cost-effective alternative that gives tires a natural, satin finish.
How to Do It
Clean the tires first. Wash the tires thoroughly with soap and water to remove dirt and old tire dressing. Dry them completely.
Mix a simple solution (optional). For a sprayable tire shine, combine 1 cup of baby oil, 1/2 cup of water, and 2-3 drops of dish soap in a spray bottle. Shake well to combine.
Apply to the tires. Spray the solution onto a clean cloth or applicator pad, then wipe it onto the tire sidewall. Alternatively, you can apply baby oil directly to a cloth and rub it into the tire.
Let it dry. Allow the oil to soak in for a few minutes, then buff off any excess with a dry cloth to avoid sling.
A single application can provide a rich, dark shine that lasts for several days. While it won’t last as long as commercial tire dressings, it is far cheaper and won’t harm your tires or wheels.
Important Safety Precautions
While baby oil is generally safe for car exteriors, there are a few important cautions to keep in mind:
Where NOT to Use Baby Oil
Steering wheels, shift knobs, and pedals: Baby oil leaves a slippery residue that can compromise your grip and create a serious safety hazard. Never apply it to any surface you need to grip or control.
Windshields and windows: While baby oil can be used to clean headlights, it should not be used on your windshield or side windows. It will leave a greasy film that can cause glare and impair visibility.
Leather seats: While some people use baby oil on leather, it can clog the pores of the leather and attract dust. It’s better to use a dedicated leather conditioner.
Matte or textured surfaces: Baby oil can leave a greasy residue on matte finishes that is difficult to remove. Stick to smooth, glossy surfaces.
General Tips
Always test first: Before applying baby oil to any surface, test it on a small, inconspicuous area to ensure it doesn’t cause discoloration or damage.
Use sparingly: A little baby oil goes a long way. Using too much will leave a greasy residue that attracts dust and dirt.
Buff thoroughly: Always buff off excess oil with a clean, dry cloth to prevent a greasy finish.
Wash before you apply: Baby oil works best on clean surfaces. Washing your car before applying oil-based products will give you better, longer-lasting results.
Baby Oil vs. Commercial Products
Task
Baby Oil
Commercial Product
Headlight restoration
Temporary improvement; lasts a few days to a week
Professional kit provides longer-lasting results
Trim restoration
Quick, temporary shine; costs pennies
Trim restorers last for months but cost $10-$20
Adhesive removal
Gentle, effective, safe for paint
Goo Gone works faster but contains harsh solvents
Tire shine
Natural satin finish; very inexpensive
Silicone-based shines last longer but can dry out rubber
For quick touch-ups and budget-friendly maintenance, baby oil is an excellent choice. For long-term restoration, commercial products will give you better durability.
The Bottom Line
Baby oil is one of the most versatile and underrated tools in your car care arsenal. It can restore cloudy headlights, revive faded trim, dissolve stubborn adhesive residue, and give your tires a rich, dark shine—all for just a few dollars. While the results are temporary, the cost and convenience make it an excellent addition to your detailing routine.
The next time you’re looking to give your car a quick refresh without breaking the bank, reach for that bottle of baby oil. Just remember to follow the safety precautions, test on an inconspicuous area first, and avoid applying it to any surface you need to grip. Your car will thank you.
Disclaimer: This article is for informational purposes only. Always test any product on an inconspicuous area before applying it to your vehicle. The author is not responsible for any damage that may result from the use of these methods.
To provide the best experiences, we use technologies like cookies to store and/or access device information. Consenting to these technologies will allow us to process data such as browsing behavior or unique IDs on this site. Not consenting or withdrawing consent, may adversely affect certain features and functions.
Functional
Always active
The technical storage or access is strictly necessary for the legitimate purpose of enabling the use of a specific service explicitly requested by the subscriber or user, or for the sole purpose of carrying out the transmission of a communication over an electronic communications network.
Preferences
The technical storage or access is necessary for the legitimate purpose of storing preferences that are not requested by the subscriber or user.
Statistics
The technical storage or access that is used exclusively for statistical purposes.The technical storage or access that is used exclusively for anonymous statistical purposes. Without a subpoena, voluntary compliance on the part of your Internet Service Provider, or additional records from a third party, information stored or retrieved for this purpose alone cannot usually be used to identify you.
Marketing
The technical storage or access is required to create user profiles to send advertising, or to track the user on a website or across several websites for similar marketing purposes.